Configure and Populate the Local Threat Intelligence Server
In this topic:
Note
The Local Threat Intel server is not yet generally available. Contact your Customer Success representative to request access to this feature.
Overview
The Local Threat Intel server is a local implementation of the Global Threat Intel server, intended for air-gapped environments that cannot connect to the Global Threat Intel server directly. The Local Threat Intel server provides additional context and enrichment for indicators of compromise (IOCs) in your environment. The data acquired from the Global Threat Intel server can help the organization’s decision-making process when uncovering malicious activity.
For more information about the different deployment options available to air-gapped and non-air-gapped Cybereason On-Prem customers, see Communication with Threat Intel services.
The Local Threat Intel server includes millions of reputation items, and leverages information from global intel sources to help determine the reputation of a given file or domain. The Local Threat Intel server, which supports millions of reputations in total.
In addition, Cybereason offers a Private Threat Intel server, which is specific to your environment. With the Private Threat Intel server, you can manage local reputations and upload reputations in bulk using a CSV file. The Private Threat Intel server supports up to 100,000 reputations. We recommend that you use the Private Threat Intel server to host your organization’s custom reputation information, such as allowlists and blocklists, and override the Local Threat Intel server’s reputations.
Install the Local Threat Intel server
Cybereason prepopulates the Local Threat Intel server with reputation items.
Starting with version 23.1, the Local Threat Intel server is a container inside the Microservices Server.
To install the Local Threat Intel server:
Prepare your CSV file as usual. Do not mark the field ‘airgap’ and do not add lines representing sage and mongodb servers.
Instead, in the third screen (Stage 3/3) of the deployment configuration, mark the ‘Enable LTI’ flag (do not change the ‘Sage port’ field).
Deploy the Local Threat Intel container in your environment.

Configure the Threat Intel database
Prepopulate the server with data. Note that this step includes 25 JSON files, and may take several hours. The computer may run slowly until the process is complete.
Deploy the Local Threat Intel server
Follow the steps 1 through 5 in the Installation Overview.
Verify that the Server Configuration File contains the Local Threat Intel server and the Threat Intel database.
Configure the threat intel database
Before you begin
Make sure that the sage-av-11-2023.zip file can be seen under the location /opt/cybereason/mongo_data/ in the Microservices server.
Note
For new deployments of airgapped-based systems, sensors should not be connected to the system before populating the initial Local Threat Intel database.
To update the Threat Intel server with the required configuration:
Connect to the WebApp server and stop the tomcat service:
service tomcat status
service tomcat stop
service tomcat status
Connect to the Microservices server.
Ensure you have the following files on your Microservices machine in the above folder (/opt/cybereason/mongo_data):
sage-av-2023.zip
load_cLTI_Data.py
upload.bash
Unzip sage-av-11-2023.zip.
Add execution permissions to the upload.bash script
chmod +x upload.bash
Run the Python script as root from /opt/cybereason/mongo_data/ folder:
python3 load_cLTI_Data.py --host-address <microservices-server-ip> --sage-port 10443 --dir <location-inside-mongo-container>

Example: # python3 load_cLTI_Data.py --host-address 172.53.20.26 --sage-port 10443 --dir /tmp
Note
The process may take up to 2 hours.
To see the progress, you can take a look at the dedicated log (you will need to open an additional SSH session to the Microservices server):
docker exec -it mongodb /bin/bash
tail -f /tmp/mongo_upload.log
Restart the sage docker from SSH (root user prompt is required):
docker stop sage
docker start sage
9.Check in the docker log log that the tomcat service of sage finished the startup (this takes around 2 minutes).
docker ps
Start the tomcat service of the WebApp server:
service tomcat start
service tomcat status
Search in the $CATALINA log of the Detection servers for:
records from sage

OR

Product Classification
A message that indicates a successful download should be seen, as in the following example (partial list):
Sage scheduling thread pool - Thread-xx] INFO c.c.e.d.DatasetBase:xx - File Classification - Reloading data from sage yyyy-mm-dd hh:mm:s,

Sage scheduling thread pool - Thread-xx] INFO c.c.e.d.DatasetBase:xx - Constants Classification - Reloading data from sage yyyy-mmm-dd hh:mm:s,

Sage scheduling thread pool - Thread-xx] INFO c.c.e.d.DatasetBase:xxx - File Classification - Downloaded x records from sage. Update time is: xxx

Sage scheduling thread pool - Thread-xx] INFO c.c.e.d.DatasetBase:xx - File Extension Classification - Reloading data from sage x

Sage scheduling thread pool - Thread-xx] INFO c.c.e.d.DatasetBase:xx - File Extension Classification - Downloaded xxx records from sage.
Sanity Tests
Connect to the Microservices server via SSH.
Connect to the Local Threat Intel database(Mongodb docker):
docker exec -it mongodb /bin/bash
mongo --host <Microservices_server_ip>
use cybereason
Run the following command and check if the collection “file_classification_sage_customer value” exists:
show collections
Run the following command, and copy the first visible ID without quotes:
db.file_classification_sage_customer.find()

For example: ebb22fd15d53791cf60e7755e624ee512af54ae7
In a Web browser, connect to the Cybereason Defense Platform.
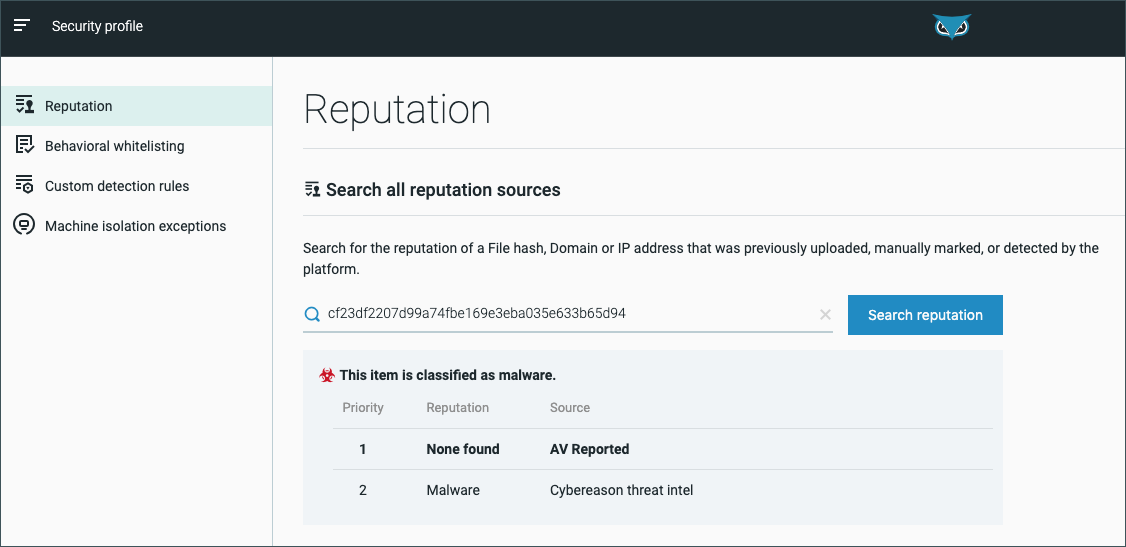
Under Security Profile > Reputation List, search for the ID that you copied in step 4.
Verify that you can view the reputation.
Local Threat Intel DB update maintenance
Download the latest update from Cybereason MFT:
First, download the latest LTI update files. To do so, ask your Cybereason Technical Representative for credentials to Cybereason MFT.
The Cybereason representative will send you an email invitation to register to the Cybereason MFT. Follow the instructions in the email to complete the registration.
Once you have registered, access the Cybereason MFT.

Inside the folder “LTI updates”, you will find a folder for every weekly update. Go to the latest folder and download the related JSON file.
To run the script:
Open SSH to the Configuration Management server and open an SSH connection to the Microservices VM.
Transfer the LTI update file(s) to the Configuration Management server. Use the scp command to copy the LTI update file(s).
Copy the updated file from the Microservices VM SSH shell to /opt/cybereason/mongo_data/airgap/LTI_Updates (if the ‘LTI_Updates’ folder does not exist, create it).
To make the script executable,at a command prompt, type:
chmod +x uploadMultipleFilesToAirgap.sh
To run the script, at a command prompt, type:
./uploadMultipleFilesToAirgap.sh <dataFolder> <IP>:<PORT>
where:
<dataFolder> is the path to the folder where you extracted the prod_ready_for_airgap.zip file.
<IP> is Microservices server IP.
<PORT> Is the port that the Microservices server sage containers listening to.
For example:
./uploadMultipleFilesToAirgap.sh /opt/cybereason/mongo_data/airgap/LTI_Updates 181.11.0.15:10443
The script uploads each file to the folder, one file at a time. The script indicates if the upload was successful or if an error occurred.
Example flow: Upload reputations to the Local Threat Intel server
This example demonstrates how you can upload a single reputation item and then search and view that reputation in the Cybereason Defense Platform under the Security profile screen’s Reputation section. While a typical use case for the Local Threat Intel server consists of uploading large amounts of reputations, this example simply demonstrates the high-level flow of uploading and viewing reputations using the API and the Cybereason Defense Platform.
Add a reputation for the www.domain.com domain using the key field in the API request.
Under the Security profile screen’s Reputation section, type www.domain.com in the search bar and click Search reputation.
The search results present a table listing the item’s reputations according to different Cybereason sources. In this example, the www.domain.com item is listed as Malware, classified by the Local Threat Intel server.
View logs for the Local Threat Intel server
To view logs related to the Sage and MongoDB containers, use the docker logs command for the relevant container.
When you upload data to the MongoDB, you can monitor the logs for the upload status and additional information. For example:
INFO  c.c.s.s.u.c.s.m.ActiveCustomerClassificationDataManagement:164 - Customer classification data received.
INFO  c.c.s.s.u.c.s.u.UploadCustomerClassificationService:135 - 0 customer classifications removed from collection file_classification_sa
ge_customer, it now contains: 17802054 customer classifications
INFO  c.c.s.s.u.c.s.u.UploadCustomerClassificationService:64 - For collection: file_classification_sage_customer : 0 customer classifications were removed, 0 customer classifications were updated and 1 customer classifications were added
INFO  c.c.s.s.u.c.s.u.UploadCustomerClassificationServiceFacade:58 - Finish uploading customer classification data to persistence.
INFO  c.c.s.s.u.c.s.m.ActiveCustomerClassificationDataManagement:199 - finish process of adding the data